Using Firebird with Borland Delphi
This article will show you the first steps to connect to a Firebird 1.5 database using Delphi 7.
There are several client libraries that can be used to access a Firebird database:
- IBX. You can find these components on the "InterBase" tab of the Delphi toolbar
- dbExpress
- IbObjects (IBO). This is a package of very solid access components. The source is www.ibobjects.com and yes, you must pay for them but they are worth it.
As IBO is the best way to access a Firebird (or also InterBase) database, that's what I will use for this article. IBO is native Delphi VCL so there is no DLL or COM/OCX components that you have to deliver together with your application.
Step 1: Choosing a database
There is a database employee.fdb that comes together with Firebird, which we can use for our tests.
When you have the full Firebird server installed, the employee database resides in the {firebird}\examples folder.
You can of course use another database if you wish.
Step 2: Determining the connection string for the database
This is important so I will dig into this topic a little deeper. A good understanding will save you a lot of headaches.
The connection string for a database is assembled of these parts:
[{Database Server Name} [/{Port Number or Service Name}] ":"] {Database Filename}
Database Server Name
This is the (DNS) name of the database server or its IP address. For the local computer, the server name is always "localhost".
You can leave the server name out of the string to access a local file using the local protocol.
Port Number or Service Name
This is optional and we will not discuss this further here
A Colon
Yes, a colon character. This is important because it tells Firebird to use TCP/IP as the access protocol. You can also use NetBEUI which has a different syntax then. But because TCP/IP is the norm today, we won't dig any further into NetBEUI here.
Database Filename
This is the name of the database file. A Firebird database usually consists of exactly one file with a ".fdb" extension. The Database Name is the fully qualified path and filename of this file.
NOTE: A Firebird server will only access files on its local filesystem. So you cannot access a file that's on a remote network drive.
IMPORTANT: The database name is the path and filename of the .fdb file from the perspective of the Firebird server machine. So even if your database file resides in a directory, which is shared on the network (which is a bad idea, BTW), what the server needs is the pathname as viewed from its own machine.
Aliases: In the aliases.conf file of your Firebird folder, you can define aliases so you don't need to specify the full path and filename any more. This is convenient and more secure because the folder structure of the server is not exposed to clients.
Examples
1) Database is C:\DB\Employee.fdb on the local machine. Server string:
localhost:c:\db\employee.fdb
Connection string for local protocol: c:\db\employee.fdb
2) Database is C:\DB\Employee.fdb on server Elvis. Elvis
has a file share named DB on its C:\DB folder, and this share is
mounted as network K: on every client machine so everyone can access the
database file as K:\Employee.fdb. This doesn't matter as we want to
access the file using the Firebird server. So the connection string is: elvis:c:\db\employee.fdb
3) Database is on /db/firebird/employee.fdb on Linux server Presley. Client
machine is a Windows machine. This doesn't matter because the database name is
always given from the server's perspective. So the connection string is: presley:/db/firebird/employee.fdb
4) There is an alias defined on Elvis from example 2. The alias is
named employee. So the connection string is: elvis:employee
Step 3: User name and password
We need a valid user name and password to access a database. Firebird has its own user handling, so we can't use a normal login username/password.
A newly installed Firebird server has exactly one user set up: the system database administrator, named SYSDBA. The install-time SYSDBA password is masterkey
So for our first tests we can use SYSDBA as the user name and masterkey as the password.
NOTE: On a newly installed Firebird server on Linux, the SYSDBA password is not masterkey, but an arbitrary string. You can look it up in {firebird}/SYSDBA.password and change it using the script on {firebird}/bin/changeDBAPassword.sh
NOTE: In order to change the SYSDBA password or to create new users, you can use Firebird's GSEC tool.
Step 4: Testing the connection
Before we go to Delphi, we try to connect the database from Firebird's own ISQL tool.
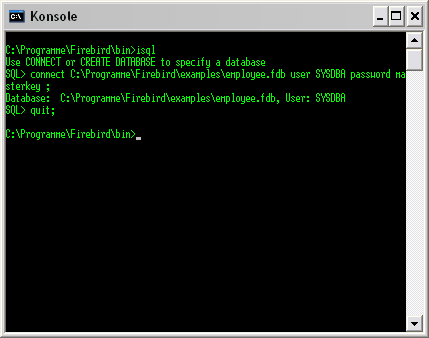
ISQL resides in the bin sub-folder of your Firebird folder. It is a command-line tool. When it starts, you can enter the CONNECT command:
CONNECT {Database Name} USER {User Name} PASSWORD {Password} ;
Don't forget the semi-colon at the end!
When the connection is successful, you get a message like in the above screen shot. If not, try another database name, user name or password.
You can leave ISQL by issuing QUIT; or EXIT; (don't forget the semi-colon :-)
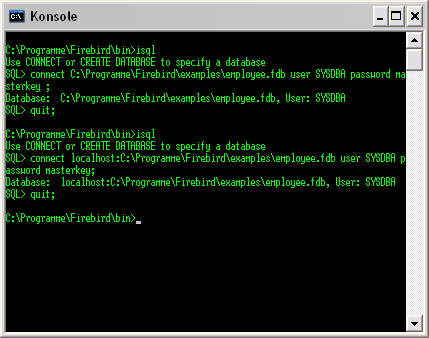
In the upper example, I have used the local protocol for access to the database. The same will work when you add "localhost:" before the database name:
Step 5: Entering Delphi
Now let's go to Delphi and see if we can access the database.
Create a new Windows VCL application and save it.
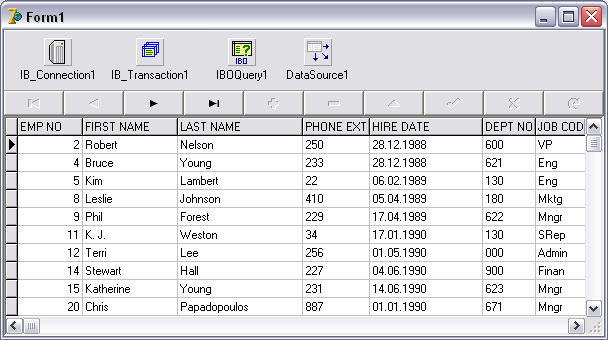
From the "iboCore" group, select a TIB_Connection and a TIB_Transaction component and place them on the main window. From the "iboTDataset" group, select a TIBOQuery component and place it on the main window:

TIB_Connection
This is the component that deals with the connection to the database. In a real-world application, it will reside on a data module or another unit which is used by all other components. Set the properties:
| Property | Contents |
|---|---|
| DatabaseName | Set this to the connection string of your database |
| Username | The user name for the connection (e.g. SYSDBA) |
| Password | The password (e.g. masterkey) |
| PasswordStorage | Set this to psNotSecure so the password gets stored when you start the application. |
| Connected | Toggle this to true after you have set the Databasename, Username, and Password properties. If everything is correct, Connected will become true. Otherwise it will stay false and there is an error message pointing out what went wrong. |
For a real-world application, you will most probably read the DatabaseName, Username and Password from a .ini file or from the registry. Setting these properties directly as we do it here is good for tests but not a good practice for real applications.
TIB_Transaction
You can open several transactions per connection, but it must be at least one. In a real-world application, you will have transactions on your forms or you will have one or more transactions on your data module. This depends on your application.
| Property | Contents |
|---|---|
| IB_Connection | Select the IB_Connection component here |
TIBOQuery
We want to display all the employees and TIBOQuery will do that for us.
| Property | Contents |
|---|---|
| IB_Transaction | Select the IB_Transaction component here |
| SQL | This is the SQL query we want to process. Enter this:
SELECT * FROM EMPLOYEE |
| Active | Set this to true. It will stay false if there is an error. |
Step 6: Making it visible
From the "Data Access" group of Delphi, add a TDataSource component and connect it with the IBOQuery component.
From the "Data Control" group of Delphi, add a TDbNavigator and a TDbGrid and connect them with the TDataSource component.
There you are:
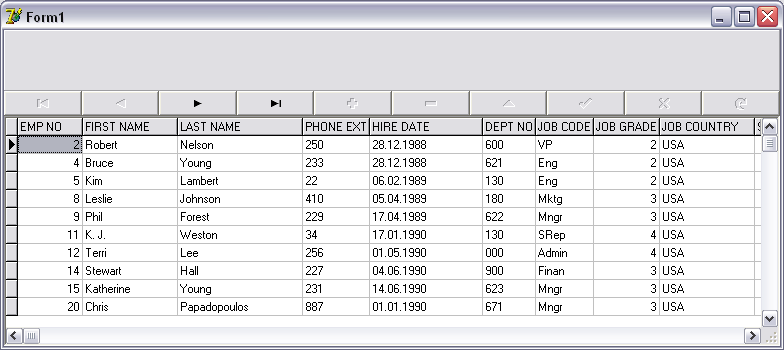
Now you can run the app and browse through the records:
Next Steps
- Try around with different SELECT statements (IBOQuery1.SQL)
- For multi-user, networked applications, you should read into what the TIB_Transaction.Isolation property does.
- Take a look at the other IBO components (e.g. TIB_Cursor, which for read-only queries is magnitudes faster than TIBOQuery or TIB_Query)
Stefan Heymann. 2006-07-10
I dedicate this Article to Jürgen Klinsmann, the German soccer coach for the 2006 world cup, who showed us what a good coach can achieve.
This documentation is licensed under (choose your favorite): GPL, LGPL, CC, IDPL, GFDL, BSD, (did I forget one?)